Pages

Showing posts with label Scanners. Show all posts

Tuesday, August 14, 2012

Backtrack 5 r3 tuts,backtrack 5 tuts,Backtrack 5R3 Tutorials

Hi Friends,
 

"The time has come to refresh our security tool arsenal – BackTrack 5 R3 has been released. R3 focuses on bug-fixes as well as the addition of over 60 new tools – several of which were released in BlackHat and Defcon 2012. A whole new tool category was populated – “Physical Exploitation”, which now includes tools such as the Arduino IDE and libraries, as well as the Kautilya Teensy payload collection."
The Backtrack team has finally released a single VMware Image (Gnome, 32 bit) for those who want other backtrack flavors.
For those requiring other VM flavors of BackTrack – building your own VMWare image is easy – instructions can be found in the BackTrack Wiki.
"For the insanely impatient, you can download the BackTrack 5 R3 release via torrent right now. Direct ISO downloads will be available once all Backtrack HTTP mirrors have synched, which should take a bit more time. Once this happens, the team will update our BackTrack Download page with all links."


BT5R3-GNOME-64.torrent (md5: 8cd98b693ce542b671edecaed48ab06d)
BT5R3-GNOME-32.torrent (md5: aafff8ff5b71fdb6fccdded49a6541a0)
BT5R3-KDE-64.torrent (md5: 981b897b7fdf34fb1431ba84fe93249f)
BT5R3-KDE-32.torrent (md5: d324687fb891e695089745d461268576)
BT5R3-GNOME-32-VM.torrent (md5: bca6d3862c661b615a374d7ef61252c5)

"The quieter you become, the more you are able to hear"


Keep visit for Backtrack 5r3 Tools tutorial


Backtrack 5 r3 tuts,backtrack 5 tuts,Backtrack 5R3 Tutorials


Sunday, March 25, 2012

W3AF Tutorial (Part 2)

Overview
From the previous article we started a basic audit with w3af. This article we are going to discuss writing scripts to start an audit and then we will discuss some of the cool tools included in w3af. The next article will hopefully be about writing plugins. So stay tuned for that. There has been a new versions released on Oct 18th. This article deals with the previous version but none of the topics I have discussed have changed.

Writing StartUp scripts
If you have an audit configuration that you use over an over then scripts are a necessity. It is pain to have to set the same options for your output, auditing and discovery features if you use the same things all the time and only change the target. We will start with a script that you can configure to meet your needs.

Create a file named anything. I will call mine basic.w3af. you write the script the same way that you would actually navigate through w3af to set the settings. So the script below will set all out audit, discovery, and output plugins so that these do not need to be set up after we start w3af.

# Basic startup script
plugins
output console,htmlFile
output
output config htmlFile
set verbosity 10
back
output config console
set verbosity 5
back
# could change this to audit all but just doing Cross Site Scripting Now
audit xss
audit

discovery webSpider,pykto,hmap,allowedMethods
discovery
back

target
set target http://localhost:8081
back


You can also add start to the end of this file and it will automatically start profiling the target when run. To run just type:
>./w3af –s basic.w3af

Looks like this:
$ ./w3af -s basic.w3af
w3af>>> plugins
w3af/plugins>>> output console,htmlFile
w3af/plugins>>> output
Enabled output plugins:
htmlFile
console
w3af/plugins>>> output config htmlFile
w3af/plugin/htmlFile>>> set verbosity 10
w3af/plugin/htmlFile>>> back
w3af/plugins>>> output config console
w3af/plugin/console>>> set verbosity 5
w3af/plugin/console>>> back
w3af/plugins>>> audit xss
w3af/plugins>>> audit
Enabled audit plugins:
xss
w3af/plugins>>> discovery webSpider,pykto,hmap,allowedMethods
w3af/plugins>>> discovery
Enabled discovery plugins:
allowedMethods
webSpider
hmap
pykto
w3af/plugins>>> back
w3af>>> target
w3af/target>>> set target http://localhost:8081
w3af/target>>> back
w3af>>>


Now just type start and your audit will begin.


Tools included in w3af
There are a few really cool tools in w3af. Move to the tools folder and list them.

w3af/tools>>> list
base64decode
base64encode
gencc
md5hash
sha1hash
urldecode
urlencode
w3af/tools>>>


With W3AF you can Generate Credit Card numbers and hashes. Open w3af and navigate to the tools folder. The gencc command can generate credit card numbers to test applications or what ever you want. It will generate the following card numbers
- mastercard
- visa16
- visa13
- amex
- discover
- diners
- enRoute
- jcb15
- jcb16
- voyager

Run the following commands to create a 16 digit visa CC#.

w3af/tools>>> run gencc -t visa16
Generated VISA 16 digit card:
4916740510259019
w3af/tools>>>


Create a sha1 hashes as follows:
w3af/tools>>> run sha1hash -e 49167405102590194916740510259019
4b52f4ce218c72a18e644f40550b2966767137c9
w3af/tools>>>


It also has feature to perform urlencoding and decoding which can come in handy when testing or auditing an application. These commands are simple enough…
w3af/tools>>> run urlencode
w3af - urlencoder

Options:
-h Print this help message.
-s Characters that should not be encoded, default is / .
-e String to be encoded.

Example: urlencode -s &% -e encodeMeNow


w3af/tools>>> run urldecode
w3af - urldecoder

Options:
-h Print this help message.
-d String to be decoded.

Example: urldecode -d decodeMeNow
w3af/tools>>>


That’s all I have so far. Currently working on w3af plugins and should have something ready soon to show. Please add any comments if you may have something to contribute or find any inaccuracies.

W3AF Tutorial (Part 1)

Overview
w3af stands for web auditing and attack framework.I have heard some say that it is the metasploit for web applications. w3af is basically a free open source web application scanner. w3af has many plugins that are divided into attack, audit, exploit, discovery, evasion, bruteforce, mangle and a few others. The code is well commented and written in python so writing your own exploits and plugins should be trivial but i cannot say for sure since i have not tried as of yet. I will spent more time on this in later articles. This will be the first of many w3af tutorials.

Getting started
I have installed it on both ubuntu fiesty and cygwin for windows. Both installs are relatively painless. Just follow the instructions in the w3afUsersGude and you will be fine.

Once you have all the prerequisites then you can start w3af as follows:

$ ./w3af
w3af>>>

Type help will give you a list of options.
w3af>>> help
The following commands are available:
help You are here. help [command] prints more specific help.
url-settings Configure the URL opener.
misc-settings Configure w3af misc settings.
session Load and save sessions.
plugins Enable, disable and configure plugins.
start Start site analysis.
exploit Exploit a vulnerability.
tools Enter the tools section.
target Set the target URL.
exit Exit w3af.
w3af>>>


First we need to talk about how the interface for w3af is configured. You move forward by typing a given option and back by typing back. Type view to see a list of configurable options and use the set command to change the options. Below we will set the target. This will be the url that we will be auditing.

Configuration:
w3af>>> target
w3af/target>>> help
The following commands are available:
help You are here. help [command|parameter] prints more specific help.
set Set a parameter value.
view List all configuration parameters and current values.
back Return to previous menu.
w3af/target>>> view
Parameter Value Description
========= ===== ===========
target A comma separated list of URLs
w3af/target>>> set target http://localhost:8080
w3af/target>>> view


Now lets configure our plugins.
w3af/target>>> back
w3af>>> plugins
w3af/plugins>>> help
The following commands are available:
help You are here. help [command] prints more specific help.
list List all available plugins.
audit Enable and configure audit plugins.
bruteforce Enable and configure bruteforce plugins.
discovery Enable and configure discovery plugins.
evasion Enable and configure evasion plugins.
grep Enable and configure grep plugins.
mangle Enable and configure mangle plugins.
output Enable and configure output plugins.
back Return to previous menu.


To audit a web application we need at least three plugins configured. Audit, discovery, and output. Typing list plus the plugin will show all available options for the plugin. If you type list audit you will see all the auditing extensions like xss, xsrf, sql injection, ldap injection, etc. Type list discovery will display all discovery options.
Just typing the plugin name (i.e audit) will display which options are loaded. By default there are no options configured for any of the plugins. You will have to add them. Some examples would be:
w3af/plugins>>> audit xss,xsrf,sqli 
To select a few options to load.
or
w3af/plugins>>> audit all 
To load all options.


I am going to configure our webserver audit to test for Cross site Scripting, typical web server vulnerabilities, and we want it to spider (crawl) the entire site. We also want to save the results into an html audit report. To do this we need to run the following commands:

w3af/plugins>>> audit xss
w3af/plugins>>> audit
Enabled audit plugins:
xss
w3af/plugins>>> discovery webSpider,pykto,hmap
w3af/plugins>>> discovery
Enabled discovery plugins:
webSpider
pykto
w3af/plugins>>> output console,htmlFile
w3af/plugins>>> output
Enabled output plugins:
htmlFile
console
w3af/plugins>>> output config htmlFile
w3af/plugin/htmlFile>>> view
Parameter Value Description
========= ===== ===========
verbosity 0 Verbosity level for this plugin.
httpFileName output-http.txt File name where this plugin will write HTTP requests and responses
reportDebug False True if debug information will be appended to the report.
fileName report.html File name where this plugin will write to


I have just configured a basic audit with w3af to test for XSS. We initially set the target to be http://localhost/ so it will scan my local apache server. I used pykto which is a perl version of nikto to scan for webserver vulnerabilities. The webSpider plugin will do all the url crawling and create lists of urls to audit. The output plugins will write the results to the command line and the html file called report.html in your application folder. The html output will not be available until the audit is complete. hmap fingerprints the server. The output-http.txt records server requests and responses.

Start the audit as follows:
w3af/plugin/htmlFile>>> back
w3af/plugins>>> back
w3af>>> start


Be prepared to wait a while for the audit to complete.
w3af>>> start
Auto-enabling plugin: discovery.allowedMethods
Auto-enabling plugin: discovery.error404page
Auto-enabling plugin: discovery.serverHeader
The Server header for this HTTP server is: Apache/2.2.3 (Ubuntu) PHP/5.2.1
Hmap plugin is starting. Fingerprinting may take a while.
The most accurate fingerprint for this HTTP server is: Apache/2.0.55 (Ubuntu) PHP/5.1.2
pykto plugin is using "Apache/2.0.55 (Ubuntu) PHP/5.1.2" as the remote server type. This information was obtained by hmap plugin.
pykto plugin found a vulnerability at URL: http://localhost/icons/ . Vulnerability description: Directory indexing is enabled, it should only be enabled for specific directories (if required). If indexing is not used, the /icons directory should be removed. The vulnerability was found in the request with id 128.
pykto plugin found a vulnerability at URL: http://localhost/doc/ . Vulnerability description: The /doc directory is browsable. This may be /usr/doc. The vulnerability was found in the request with id 1865.
pykto plugin found a vulnerability at URL: http://localhost/\> . Vulnerability description: The IBM Web Traffic Express Caching Proxy is vulnerable to Cross Site Scripting (XSS). CA-2000-02. The vulnerability was found in the request with id 3385.
New URL found by discovery: http://localhost/
New URL found by discovery: http://localhost/test2.html
New URL found by discovery: http://localhost/xst2.html
New URL found by discovery: http://localhost/xst.html
New URL found by discovery: http://localhost/test.html


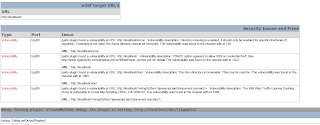
Here is an example of the results.html
Thursday, March 22, 2012

PHP : LFI server Scanner by Lagripe-Dz

 LFI ServerScanner

cyber_security1.jpg (400×300) 
Scan Server Site Trying 2 Find LFI bug

Tool w0rk with 2 marks

first : [ daemon ] it's in /etc/passwd file
second : [ failed to open stream ] when there's opening error in the page

this's result pic :

it's easy 2 use

Download Video

Monday, March 5, 2012

Download Nessus 5.0 Vulnerability Scanner Now!!


Nessus 5.0 Vulnerability Scanner Released 
Tenable Network Security officially announced the availability of Nessus 5.0 vulnerability scanner. This release introduces key features and improvements, separated into the four major phases of the vulnerability scanning process:
  1. Installation and management (for enhanced usability)
  2. Scan policy creation and design (for improved effectiveness)
  3. Scan execution (for improved efficiency)
  4. Report customization and creation (for improved communication with all parts of the organization).
Installation & Management:-
Nessus 5.0 simplifies the installation and configuration for non-technical users:

  • Installation: Nessus v5.0 has a browser-based installation wizard — no special knowledge required. Users on a wide variety of platforms — Windows, Mac, Linux, or UNIX — can have Nessus v5.0 installed within minutes.
  • Configuration and management: Nessus v5.0 configuration and management is now done 100% through the GUI.
  • With all configuration and management now done through the web interface, the Nessus user experience is the same for all users, regardless of OS.
  • With the touch of a button on the GUI, Nessus users can now quickly initiate plugin updates and see last update information.

Scan Policy Creation & Design:-
Users now enjoy improved effectiveness when creating scan policies: 

  • Over two dozen new pre-built plugin filters make it easy for security and compliance professionals to simplify policy creation for laser-focused scans on the areas that matter most. Users can quickly select multiple filter criteria, such as, Vulnerability Publication Date, public vulnerability database ID (OSVDB, Bugtraq, CERT Advisory, and Secunia), Plugin type (local or remote), information assurance vulnerability alert (IAVA), and more, to quickly identify easily-exploitable vulnerabilities. For example:
  • Scan for all easily remotely-exploitable vulnerabilities for which there is an exploit published in your favorite exploit framework.
  • Scan for local third-party client software that is unpatched.
  • Scan for systems that have been missing patches for more than a year.
  • Policies can be configured to produce reports that are locked to prevent editing.
Scan Execution: Improved efficiency:-
Nessus 5.0 users can take advantage of real-time scan results, on-the-fly filtering and sorting, and streamlined results navigation:

  • New criticality level: Nessus v5.0 now has five severity levels — Informational, Low Risk, Medium Risk, High Risk, and Critical Risk. The Informational level quickly identifies non-vulnerability information and separates it from the vulnerability detail.
  • Example: A user may want to run a query against all hosts running web servers not on the normal http or https ports, port 80 or port 443. The Informational level allows a user to quickly identify information that may be useful, but does not require immediate attention — keeping the focus on the actionable results.
  • New vulnerability summary: A new vulnerability summary and redesigned host summary make it easy to see risk level without even running a report.
  • Streamlined results navigation: One click to jump from a critical vulnerability to see the host(s) that is vulnerable to the details of the vulnerability.
  • Take advantage of real-time results: As the scan is being run, not only can you see the results as they are being gathered, but navigate and filter on them as well. This allows you to easily act upon the vulnerability data while the scan is happening.

Report Customization:-

New reporting features allow for improved communication of vulnerability results with all parts of the organization:

  • Results filtering and report creation: Results filtering and report creation is more flexible than ever before. Users can apply multiple result filtering criteria, and targeted reports can be generated against the filtered results.
  • Create reports that contain only exploitable vulnerabilities, multiple risk levels (e.g., only show critical and high risk findings), filter on CVE or Bugtraq ID, plugin name, and more!
  • Reports customized by audience: Reports can be customized for executives, systems administrators, or auditors. A user can exclude particular vulnerabilities from a report before it is generated, allowing delivery of results targeted to specific audiences.
  • Example: During an internal scan, Nessus will report that a DNS server allows recursive queries, which is its function on the internal network. As this is a known condition, a user can suppress this result in the generated report to keep focus on true vulnerabilities.
  • With four new pre-configured report formats — Compliance Check, Compliance Check (Executive), Vulnerabilities by Host, and Vulnerabilities by Plugin — users can quickly create reports by chapters.
  • Example: The company’s compliance policy dictates that passwords be greater than ten characters in length. Nessus v5.0 runs a scan against the baseline, and the Compliance Check (Executive) report shows a pass/fail result to indicate if all hosts on the network are compliant with the minimum password length. With pass/fail results, the Compliance Check (Executive) report provides a quick snapshot of the company’s compliance checklist status.
  • Report formats: Reports can be generated in native Nessus formats, HTML, and now PDF formats (requires Oracle Java be installed on the Nessus server).
  • The new PDF report format makes it easier to share reports.
  • Combined reports: Multiple report templates can be combined into one report.
  • A single report can now contain vulnerabilities sorted by host and by IP address/hostname.


To Download Nessus click Here.

PuTTY v.0.61 Released

PuTTY 0.61 is out, after over four years , with new features, bug fixes, and compatibility updates for Windows 7 and various SSH server software.
                                                         
PuTTY is a free implementation of Telnet and SSH for Windows and Unix platforms, along with an xterm terminal emulator

These features are new in beta 0.61:
Kerberos/GSSAPI authentication in SSH-2.
Local X11 authorisation support on Windows. (Unix already had it, of course.)
Support for non-fixed-width fonts on Windows.
GTK 2 support on Unix.
Specifying the logical host name independently of the physical network address to connect to.
Crypto and flow control optimisations.
Support for the zlib@openssh.com SSH-2 compression method.
Support for new Windows 7 UI features: Aero resizing and jump lists.
Support for OpenSSH AES-encrypted private key files in PuTTYgen.
Bug fix: handles OpenSSH private keys with primes in either order.
Bug fix: corruption of port forwarding is fixed (we think).
Bug fix: various crashes and hangs when exiting on failure,
Bug fix: hang in the serial back end on Windows.
Bug fix: Windows clipboard is now read asynchronously, in case of deadlock due to the clipboard owner being at the far end of the same PuTTY's network connection (either via X forwarding or via tunnelled rdesktop).

Saturday, February 25, 2012

List of Online SQL Injection Scanner Websites

http://www.be007.gigfa.com/scanner/scanner.php
http://www.sunmagazin.com/tools/hack/SQLI-Scan
http://scanner.drie88.tk
http://localvn.biz/Tools/tools/Hack-Shop/SQLI-Scan
http://wolfscps.com/gscanner.php

Monday, February 13, 2012

Hacking Tool: Angry IP Scanner

Angry IP Scanner OR IP Scan is an cross-platform network scanner designed to be fast ip scan and simple to use. It scans IP addresses and ports for a given IP range as well as has many other features.


The program uses separate threads for each scanned address to reduce scanning speed. It can also display NetBIOS information: computer name, workgroup, currently logged user and MAC address.
It runs on Linux, Windows, and Mac OS X, possibly supporting other platforms as well.

It is widely used by network administrators and just curious users around the world, including large and small enterprises, banks, and government agencies.


Download Mirror:-