Pages

Thursday, August 23, 2012

Backtrack 5 R3 | Install Nvidia video driver in Backtrack 5 r3 the easy and correct way


The biggest pain for me was finding out how to disable the nouveau driver to allow the Nvidia driver to be install because with out disabling it you will get nothing done..
[/size]
Restart your computer and before you go into the GUI for Backtrack or type startx  type these commands to Disable the Kernel Nouveau.


Driver Download http://www.nvidia.com/Download/index.aspx?lang=en-us

 --------> I renamed mine to 21.run soon after I downlaoded the driver from Nvidias site and placed it in the root of my drive so I could find it easily since I would be navigating through terminal only and wouldn't be in the GUI for this install.


Only paste in the blue highlighted text into terminal

1. echo options nouveau modeset=0 | sudo tee -a /etc/modprobe.d/nouveau-kms.conf

2. update-initramfs -u

Super important every one make sure to reboot your computer after typing the 2 commands above.

After the 2 commands above restart your computer once again or it will not go through the install process..

Make sure your haven't typed startx yet or gone into the GUI Backtrack  for these steps as well or it will not install the driver.

3. init 3

After the 2 commands above restart your computer once again or it will not go through the install process..

Now install the NVIDIA Driver.

4.   sh <filename>.run   -------------> This is the name of your downloaded Nvidia driver


My install is now like 5x faster and has no lag opening pages...etc since I installed the driver. This was a big performance booster for me

Backtrack 5 r3 tutorials | Installing backtrack 5 R3 in virtual machine step by step


In this tutorial i will show you how to install Backtrack 5 R3 which is recently  released by offensive security team . if you've previously installed backtrack then you might be familiar with backtrack installations  . its easy and simple just follow given simple steps.


Stage 1 

Requirements
1 : Download backtrack ISO from here
2 :  Download VMware Workstation or  VMplayer
3 : Install any of above

Stage 2

Installation 

1 : Create A new virtual machine
Installing backtrack 5 R3 in virtual machine step by step  [ how to ]
2 : choose installer ISO ( choose backtrack 5 ISO ) Installing backtrack 5 R3 in virtual machine step by step  [ how to ]
3 : choose Linux as your guest operating system type and Ubuntu as version
Installing backtrack 5 R3
4 : give a name and location of your backtrack VM 
Installing backtrack 5 R3
5 : Specify virtual hard drive space ( 20 GB is good enough )
Installing backtrack 5 R3
then click finish from ready to create vm window 
Installing backtrack 5 R3
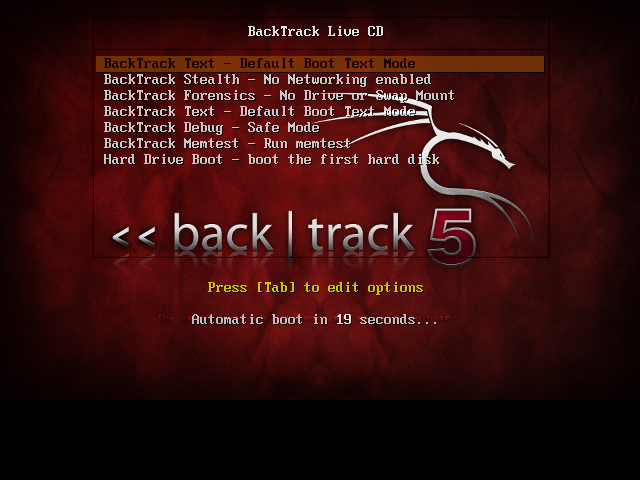
hit enter to go boot screen then choose default boot text mode and hit enter
Installing backtrack 5 R3
HIT ENTER AT THIS POINT
Installing backtrack 5 R3
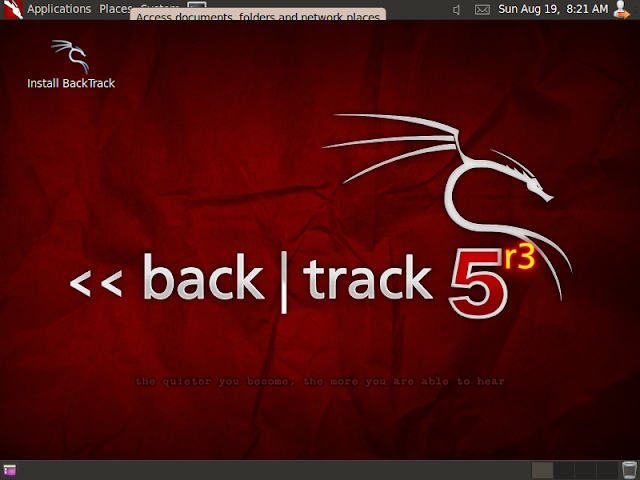
type startx to start GUI ( x server ) 
click on Install backtrack icon or open terminal type sh -c "ubiquity" 
Installing backtrack 5 R3

and continue like normal installation choose keyboard type and provide location info 
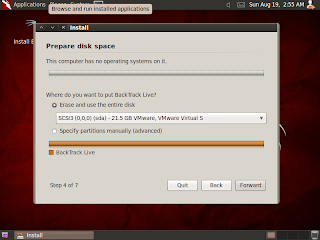
if you are installing just backtrack then go normally and erase and use entire disk 
or if you installing backtrack with other OS then specify partition accordingly ( in this tutorial m using virtual hard-drive ) 
Installing backtrack 5 R3
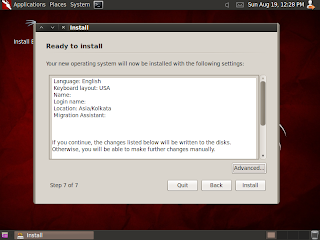
click on forward and click on install 
Installing backtrack 5 R3
wait until it finish installing 
it will take up-to 30 minutes depend on your system
Installing backtrack 5 R3


Stage 3
Network Configuration 
virtualbox guest audition installation 
vmware tools installation 
backup and recovery
snapshots

Thursday, August 16, 2012

Backtrack r3 tutorials | Upgrade From BackTrack 5 R2 to BackTrack 5 R3

Backtrack r3 tutorials

 
Recently,  released the long-awaited BackTrack 5 R3 but for those of you who don’t want to start fresh with a new installation, have no fear because you can easily upgrade your existing installation of R2 to R3.
Our primary focus with this release was on the implementation of various bug fixes, numerous tools upgrades and well over 60 new additions to the BackTrack suite. Because of this, the upgrade path to BackTrack 5 R3 is relatively quick and painless.
First, you will want to make sure that your existing system is fully updated:
apt-get update && apt-get dist-upgrade
With the dist-upgrade finished, all that remains is the install the new tools that have been added for R3. An important point to keep in mind is that there are slight differences between the 32-bit and 64-bit tools so make sure you choose the right one.

32-Bit Tools

apt-get install libcrafter blueranger dbd inundator intersect mercury cutycapt trixd00r artemisa rifiuti2 netgear-telnetenable jboss-autopwn deblaze sakis3g voiphoney apache-users phrasendrescher kautilya manglefizz rainbowcrack rainbowcrack-mt lynis-audit spooftooph wifihoney twofi truecrack uberharvest acccheck statsprocessor iphoneanalyzer jad javasnoop mitmproxy ewizard multimac netsniff-ng smbexec websploit dnmap johnny unix-privesc-check sslcaudit dhcpig intercepter-ng u3-pwn binwalk laudanum wifite tnscmd10g bluepot dotdotpwn subterfuge jigsaw urlcrazy creddump android-sdk apktool ded dex2jar droidbox smali termineter bbqsql htexploit smartphone-pentest-framework fern-wifi-cracker powersploit webhandler

64-Bit Tools:

apt-get install libcrafter blueranger dbd inundator intersect mercury cutycapt trixd00r rifiuti2 netgear-telnetenable jboss-autopwn deblaze sakis3g voiphoney apache-users phrasendrescher kautilya manglefizz rainbowcrack rainbowcrack-mt lynis-audit spooftooph wifihoney twofi truecrack acccheck statsprocessor iphoneanalyzer jad javasnoop mitmproxy ewizard multimac netsniff-ng smbexec websploit dnmap johnny unix-privesc-check sslcaudit dhcpig intercepter-ng u3-pwn binwalk laudanum wifite tnscmd10g bluepot dotdotpwn subterfuge jigsaw urlcrazy creddump android-sdk apktool ded dex2jar droidbox smali termineter multiforcer bbqsql htexploit smartphone-pentest-framework fern-wifi-cracker powersploit webhandler

Backtrack 5 r3 Tutorials | How to install Backtrack 5 R3

Now i'm going to teach about "How to install backtrack 5 R3 in windows , Linux , and Mac.

 Watch this Video and try now..


How to Recover Data from a Crashed Hard Drive


Today, we will help you how to Recover Data from a Crashed Hard Drive. When your PC switch off suddenly due to any hardware failures or software error problems. If you are regular computer user; you may know that a hard drive failure is an unpredictable situation. It happens very often that your hard drive gets crashed and you ultimately lose you precious saved data and files leading to great discontentment and grief. It's really a worst condition when you are working on an important file or data or picture etc and suddenly everything gets blank and Oh God, your hard disk breaks down. And it becomes even more critical when you don't have any backup installed in your computer at all.
Though crashing hard drive means total data loss from your computer system but now with the advancements in IT technology, it has become possible to recover your data or file or work when the hard drive stops booting. There are various methods with which you can recover your important data and fix the problem at the ease of your own comfort without waiting for the technician to come. Here I am discussing how to recover your data from a crashed hard drive. Some times your pc may crash due to virus attacks. So in order to avoid such situtatuions you need to secure your pc with good antivirus softwares.


The first step to be taken for solving the problem is to take out the crashed hard drive from the system. Then install this hard drive in another computer as a secondary drive having Windows installed on it. After it, boot into Windows and install PC Inspector File Recovery. The software is available at free of cost and we provided the download link of the application at the end of the article. But always install it on the primary drive to avoid the over-writing of files you are going to restore. After downloading the PC Inspector File Recovery, open it and select the language. The software is compatible for all windows versions xp/vista/7 and windows 8. A welcome screen will appear with having three options in it:
Recover deleted files

This option enables you to restore only those files which have been deleted permanently from your drive and have not been over-written yet.

Find lost data

By choosing this option, you will be able to recover the data which has been lost as a result of hard drive crash. With this option, you will further get two more options of "start cluster" and "end cluster". It's better to leave the scanning process of entire drive as it takes a long time depending on the size of your drive.

Find lost drive

It is the third option which should be used when you don't see your drive letter in my computer or windows explorer. This option will help you connect the drive and to find your lost data.

But in the case, if there is no secondary computer to work with, go for the Ultimate Boot CD for Windows. With the help of UBCD, you will be able to boot into Windows which will then run utilities on the damaged drive that will help you solve the issue. With UBCD, you gain an access to various utilities and PC Inspector File Recovery is also one of them which can be run on the system from a CD. For creating UBCD for Windows, you require a PC with Windows XP and XP Installation CD. To keep your crashed hard drive into the freezer is also a successful method to recover the data or files. Download Here

If all of the above mentioned methods not work, It's time to send your hard drive in the hands of a computer technicians who will use any data recovery tool or apps to help you recover your lost data successfully. However, you may also search for a data recovery software online and get it installed on your computer system.

Hard drive crash is a common problem that can happen with anybody at any time. So search for the right option and save your precious data and files from getting corrupted.

Ilya Elbert writes for several ITSupportDenver and Computer Repair Denver companies.

Download Link for PC Inspector File Recovery

Tuesday, August 14, 2012

Backtrack 5 R3 Facebook Hacking Real!!!

Hi guys,
This video tutorials about Facebook hacking,now i show how to hack Facebook account using Backtrack r3


Don't forget to Join with us on

FACEBOOK FAN PAGE www.facebook.com/sundaravelit

Join Our Group for Help www.facebook.com/groups/hackinghelp

Keep visit for our More backtrack 5 r3 tutorials

Backtrack 5 r3 tuts,backtrack 5 tuts,Backtrack 5R3 Tutorials

Hi Friends,
 

"The time has come to refresh our security tool arsenal – BackTrack 5 R3 has been released. R3 focuses on bug-fixes as well as the addition of over 60 new tools – several of which were released in BlackHat and Defcon 2012. A whole new tool category was populated – “Physical Exploitation”, which now includes tools such as the Arduino IDE and libraries, as well as the Kautilya Teensy payload collection."
The Backtrack team has finally released a single VMware Image (Gnome, 32 bit) for those who want other backtrack flavors.
For those requiring other VM flavors of BackTrack – building your own VMWare image is easy – instructions can be found in the BackTrack Wiki.
"For the insanely impatient, you can download the BackTrack 5 R3 release via torrent right now. Direct ISO downloads will be available once all Backtrack HTTP mirrors have synched, which should take a bit more time. Once this happens, the team will update our BackTrack Download page with all links."


BT5R3-GNOME-64.torrent (md5: 8cd98b693ce542b671edecaed48ab06d)
BT5R3-GNOME-32.torrent (md5: aafff8ff5b71fdb6fccdded49a6541a0)
BT5R3-KDE-64.torrent (md5: 981b897b7fdf34fb1431ba84fe93249f)
BT5R3-KDE-32.torrent (md5: d324687fb891e695089745d461268576)
BT5R3-GNOME-32-VM.torrent (md5: bca6d3862c661b615a374d7ef61252c5)

"The quieter you become, the more you are able to hear"


Keep visit for Backtrack 5r3 Tools tutorial


Backtrack 5 r3 tuts,backtrack 5 tuts,Backtrack 5R3 Tutorials